How To Adjust Your Online Ordering Hours
Adjusting the Online Ordering at your location is a critical step to ensuring no orders are mistakenly placed while your establishment is closed. To make this as easy as possible, we have created step-by-step instructions on how to adjust your Online Ordering hours per your Online Ordering platform. Regardless of the holidays, these steps can be used anytime you need to turn off and on Online Ordering:
OrderCounter POS Instructions:
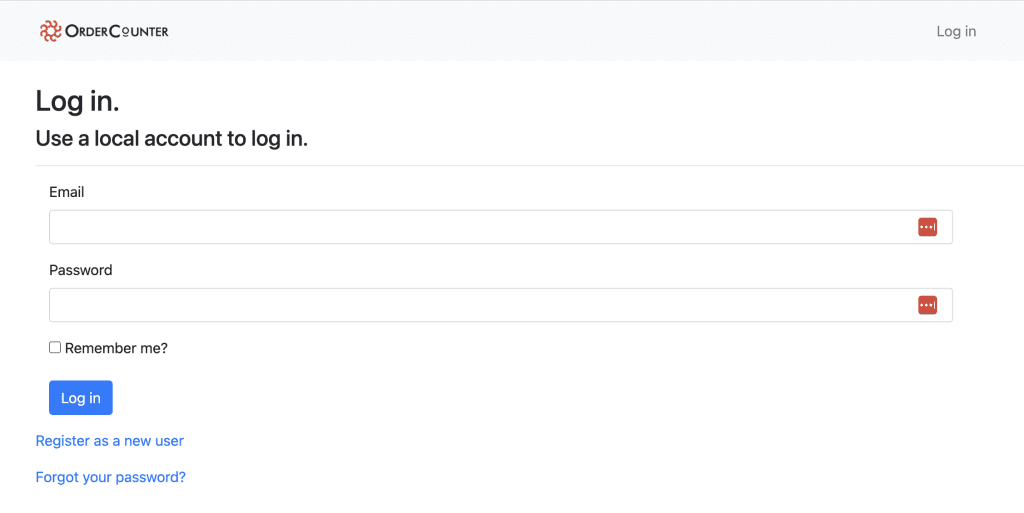
1. Log Into Your Account
Start by heading to your OrderCounter dashboard and logging in.
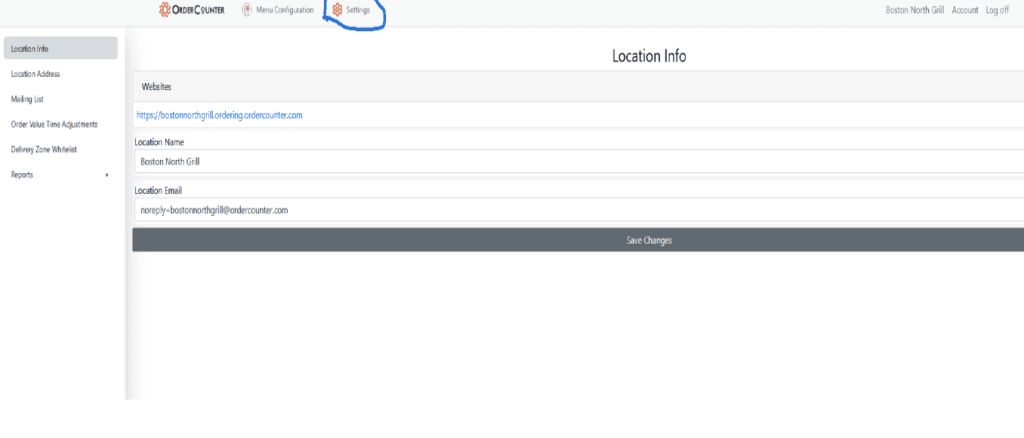
2. Navigate to Settings
Once inside your dashboard, click Settings at the top of the screen.
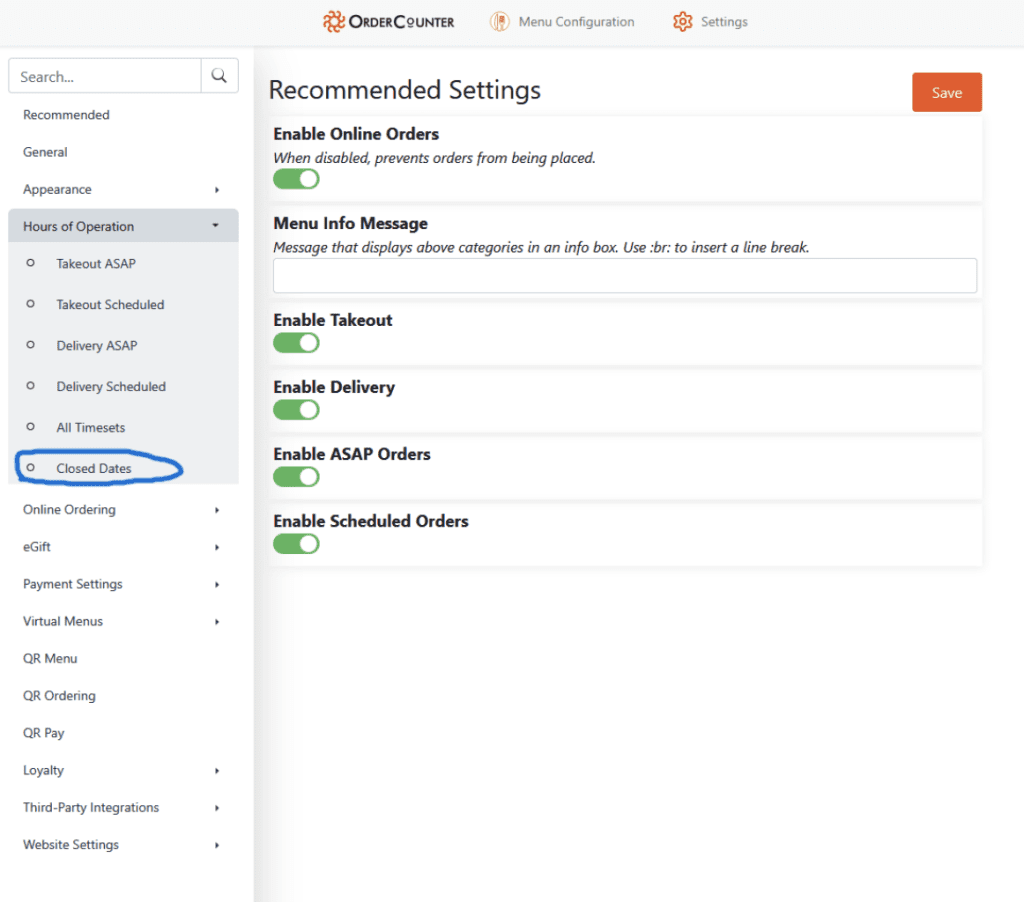
3. Go to Hours of Operation → Closed Dates
On the left-hand panel, select Hours of Operation, then click Closed Dates.
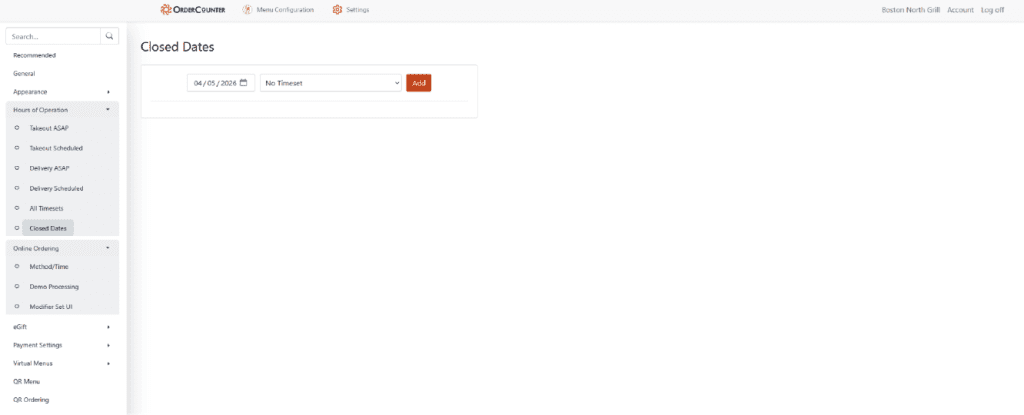
4. Add a Closed Date
Choose the date you want to close, select “No Timeset”, and click Add. This will disable online ordering for that entire day.
Thrive 8.1 & 8.2 Instructions:
1. Log into Thrive Control Center from any computer or your POS: https://thrive-control-center.grs-tcc.com/#/login
*In a pinch, you can also log into this link from your phone but a bit of patience will be needed because the website is not formatted for phone layouts.
2. Once logged in, click on Configuration, then Hours
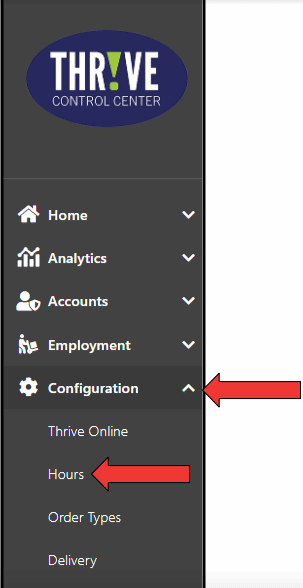
3. Scroll to the bottom of the page and click Holiday / Special Online Hours

4. Click “Add Special Hour”

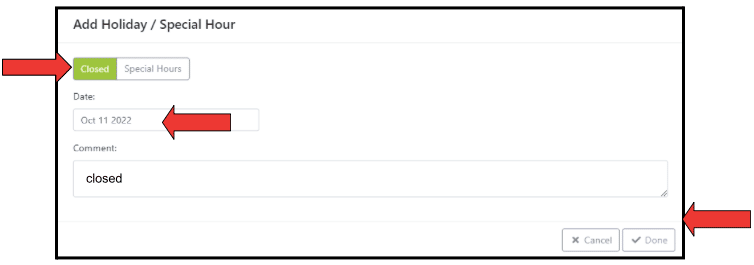
5. If closing for an entire day, click on “Closed”, enter the date you will be closed, enter a comment, and click “Done”. You can pre-schedule days in advance as well.
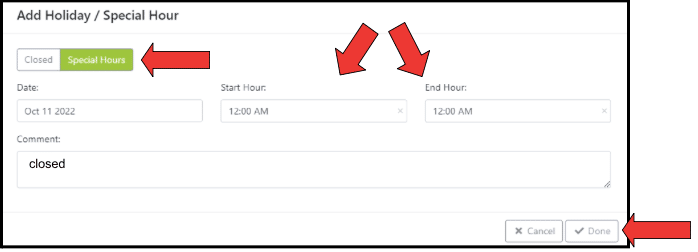
6. If closing early, click on “Special Hours”, enter the time of day you opened, the time of day you are closing, add comment, and click “Done”.
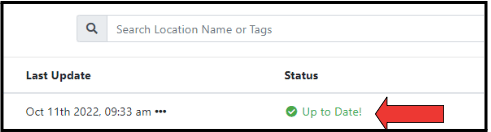
7. Most importantly, don’t forget to PUBLISH! To publish, navigate to the Menu tab, then Menus Admin. Then click “Publish”.
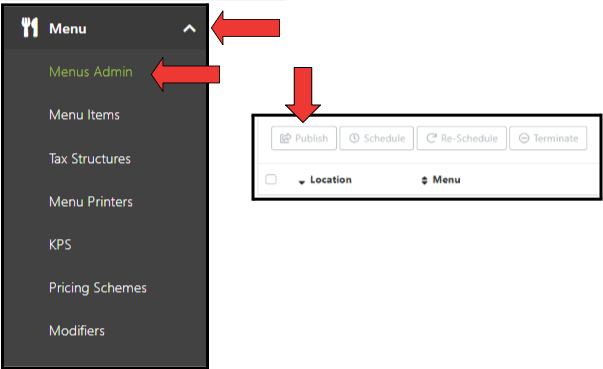
8. Your location should then show “Up to Date!” as soon as it publishes.
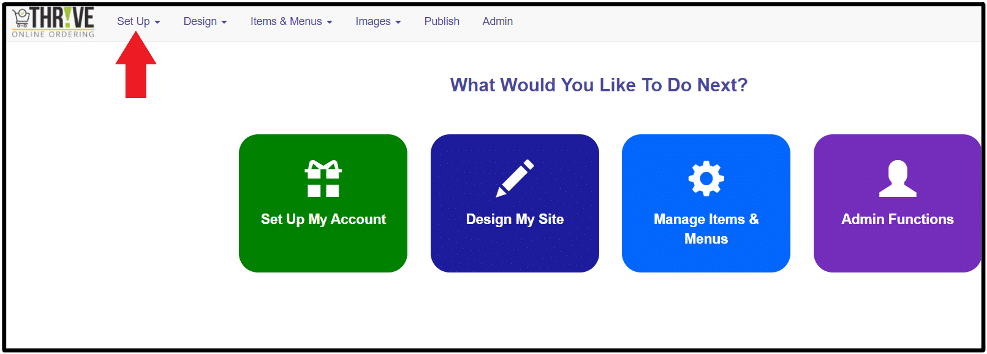
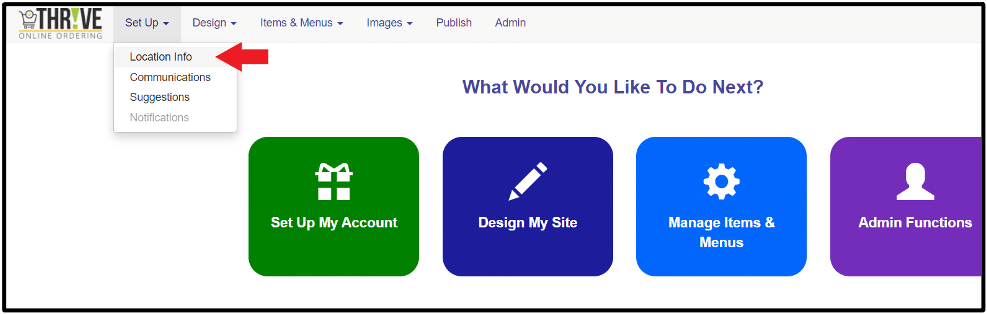
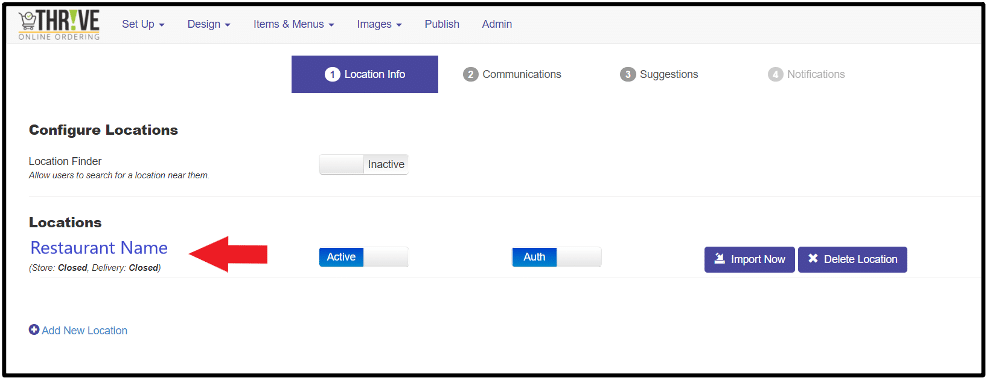
Thrive 8.0 Instructions:
1. Log into Thrive Online Admin and click on “Set Up”
2. Click on “Location Info”
3. Click on your Restaurant Name (in blue lettering)
4. Click on Holiday/Special Hours
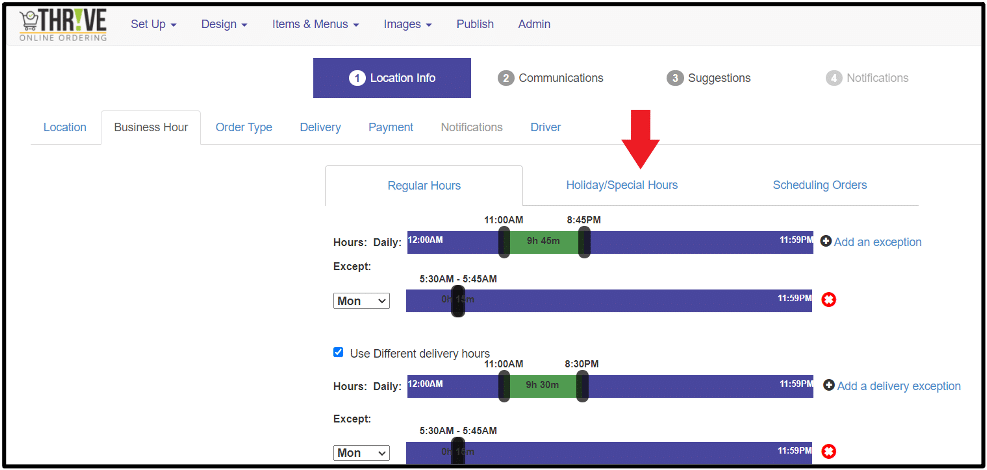
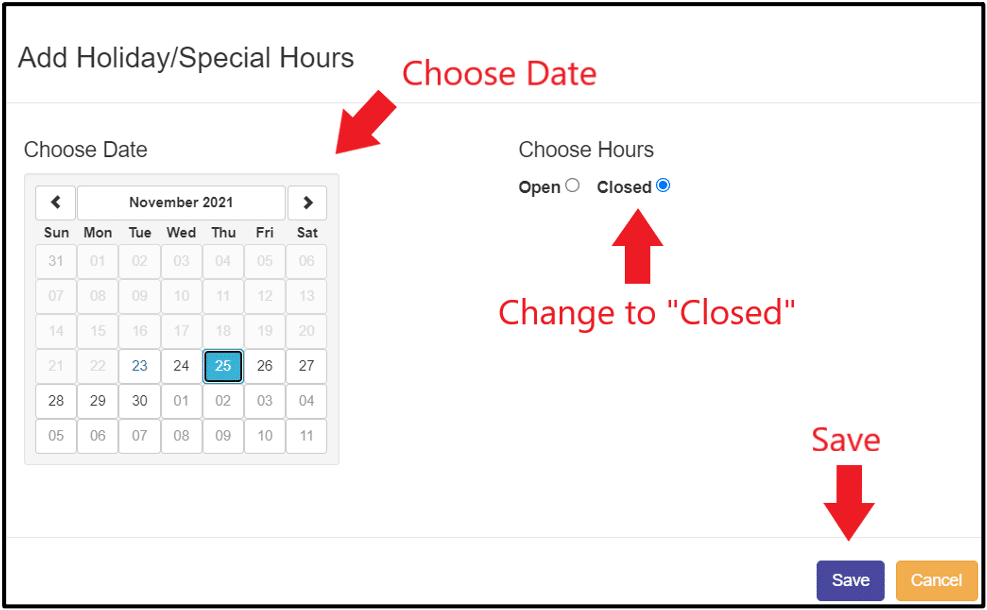
5. Add Holiday/Special Hours or edit existing Holiday Hours
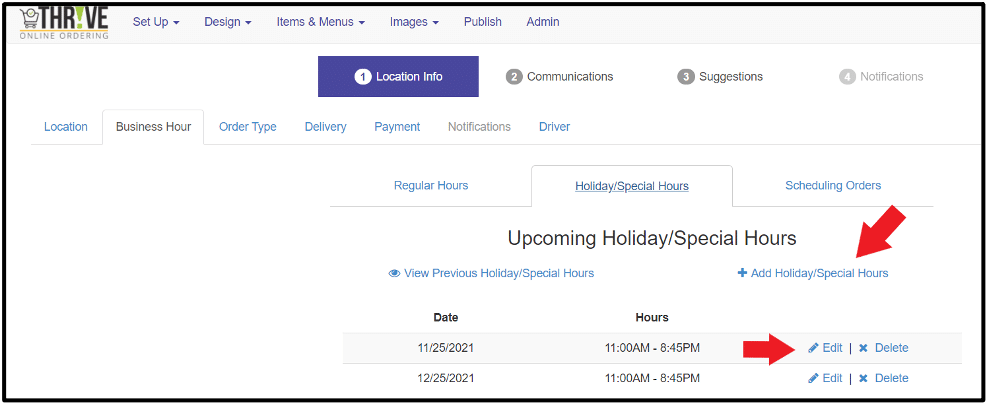
6. Choose the date to add/edit. Choose whether the restaurant is opened or closed on that date and then save.
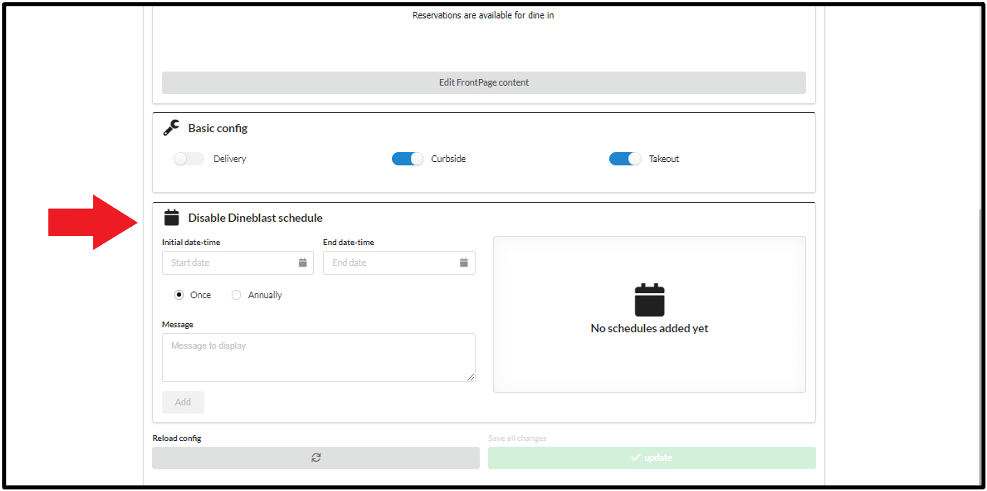
SoftTouch Dineblast Instructions:
1. Sign in with your email and password at Softtouch EZ Dash
2. Select location top right, then click on Control Panel in left column

3. Either disable online ordering by toggling off the “Site Active” button (but remember to turn back on) or choose option 4 to add a holiday.

4. Scroll down to the “Disable Dineblast Schedule” section. Enter start and end date for customized dates you wish to enable. Choose to disable only one time or annually.
SpotOn Instructions:
1. Go to SpotOn BOH (Back of House): https://restaurantpos-ea.spoton.com/b/
2. Sign in using your username and password
3. Click on Locations
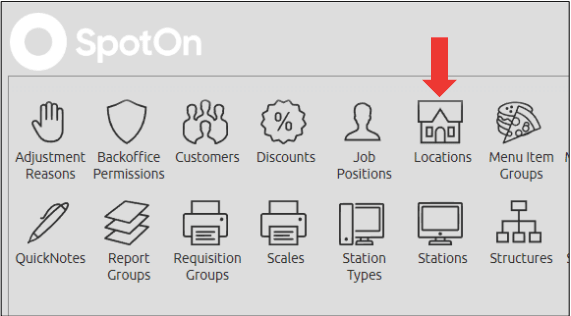
4. Make sure you are on the Location you would like to adjust:

5. Scroll down the page until you see the heading, “Dineloyal/SpotOn OLO Settings”

6. Under that heading, find where it says, “Schedule” and click the View/Edit Button to the right of it.

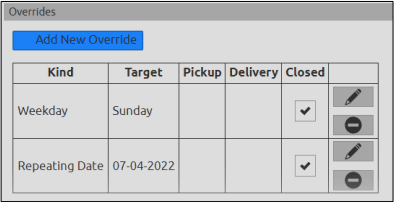
7. Under the heading, “Overrides”, click “Add New Override”

8. Check off the box next to “Closed”. Choose “Date” as the Override Kind. You can choose to “Repeat Every Year” if you desire. Click on the box next to the “Date” and choose the date you wish to close. Then click “Save” on the bottom right. Repeat this process for every date you wish to close for.

9. When you are done, your overrides will display all the dates that you are closed. That’s it!
Aldelo Instructions:
1. Log into eDiningExpress back office and access Preferences either from the dashboard or link at the top of the page.
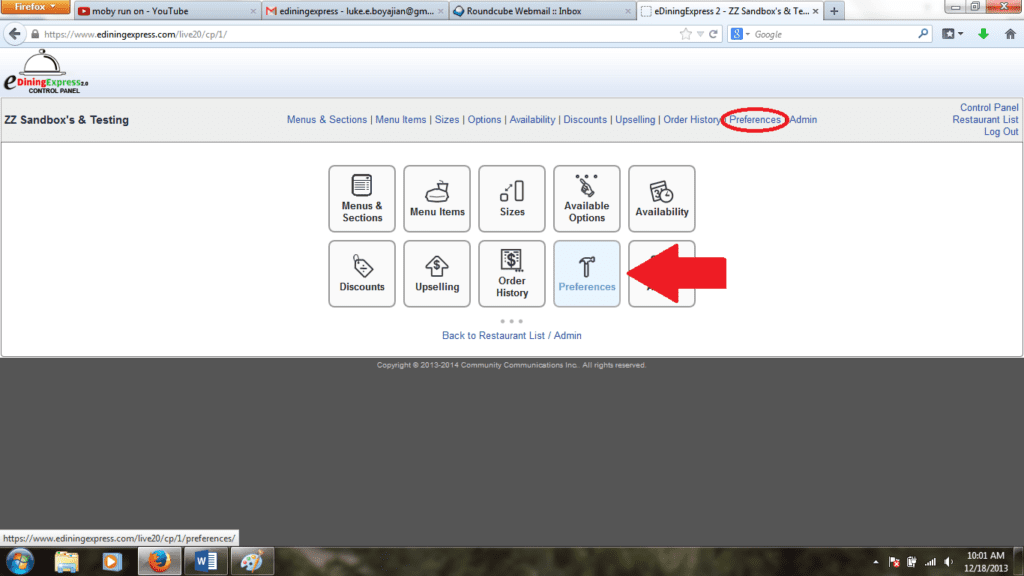
2. Clicking Preferences will bring you to the General page. Ensure you are on the correct page by looking at the tab you are under.
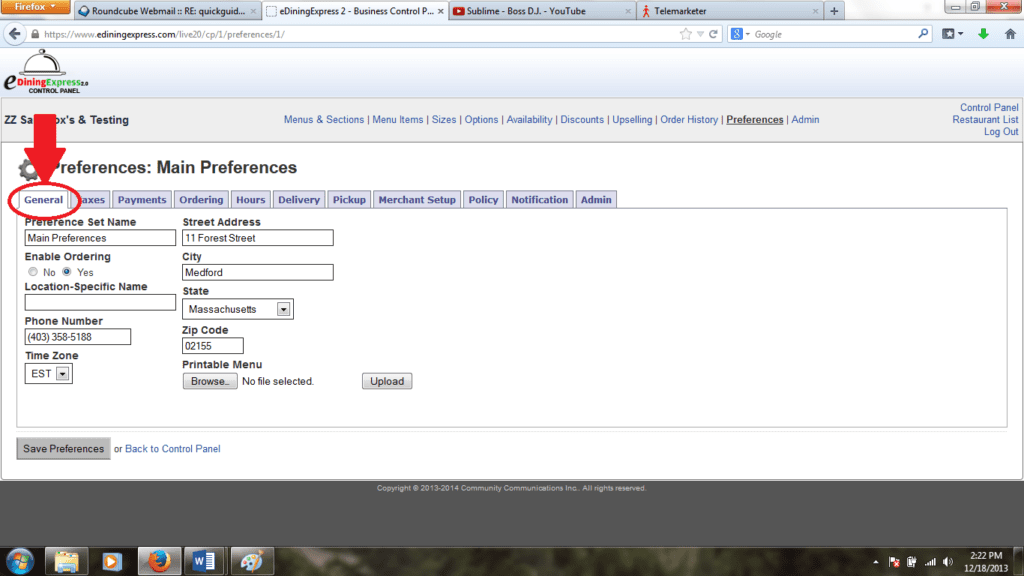
3. To turn off Online Ordering, click to “No” button underneath “Enable Ordering”.
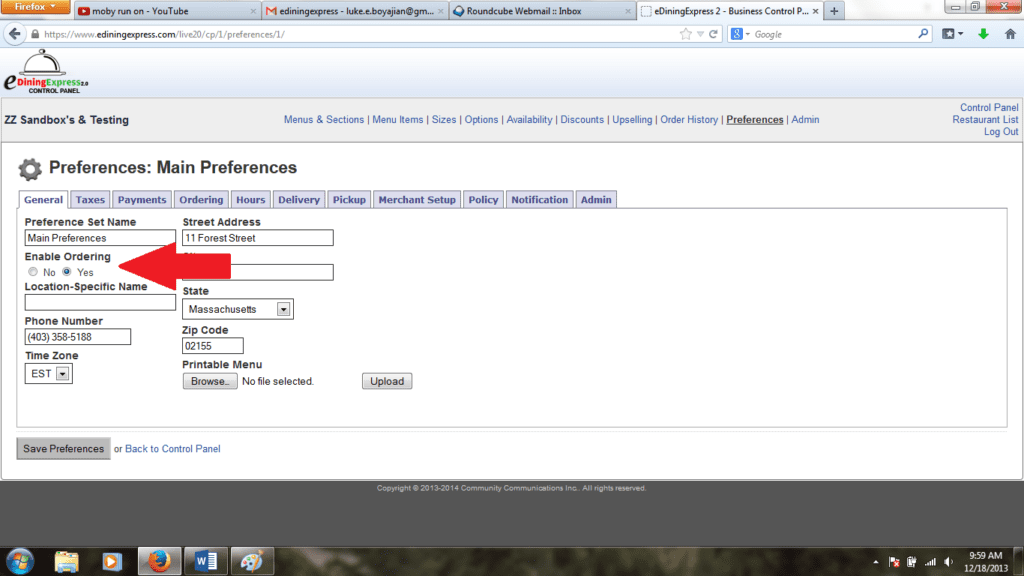
4. Click Save Preferences and you are done!
As simple as that! Now, don’t forget to turn back on if you didn’t schedule specific off hours. The BOSTON NORTH COMPANY team is always here to help, feel free to reach out to Menu@BostonNorthCompany.com if you need any further assistance.
 Tracking and managing inventory has never been easier with this fully integrated application. Set alerts for when inventory is low, reminding you to replenish items. LexgiaPOS Inventory also allows you to define minimum stock levels for any and all products, prompting the system to create automated shopping lists with every item that must be replenished. Check for the most popular items and plan restocking accordingly.
")


 Delivery service is a valuable asset for any business, as it conveniences customers and creates another avenue for profit. LexgiaPOS Driver is a fully integrated application developed for restaurants as well as their drivers to foster a seamless delivery process.
 Quickly and easily assign drivers to certain deliveries or delivery routes within the system, speeding up the process. They can be informed anywhere at any time with SMS alerts, allowing for route changes and quick turnaround time. The system provides real-time driver status and allows you to collect data to measure driver performance.


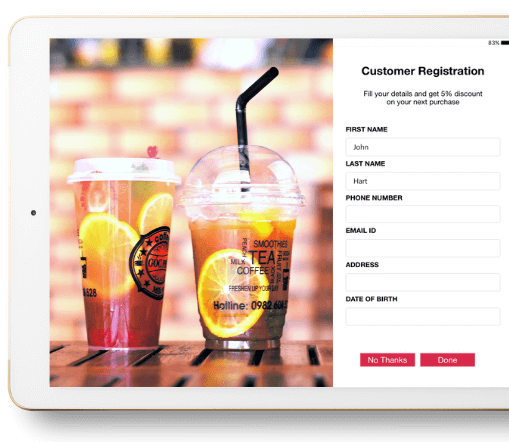 LexgiaPOS's S customer loyalty application allows businesses to create customized loyalty programs based on the best interests of both their consumers and the business itself. Loyalty rewards can be based on a variety of factors, including enrollment, customer visits, a fixed spent amount, specific menu items, and menu category.
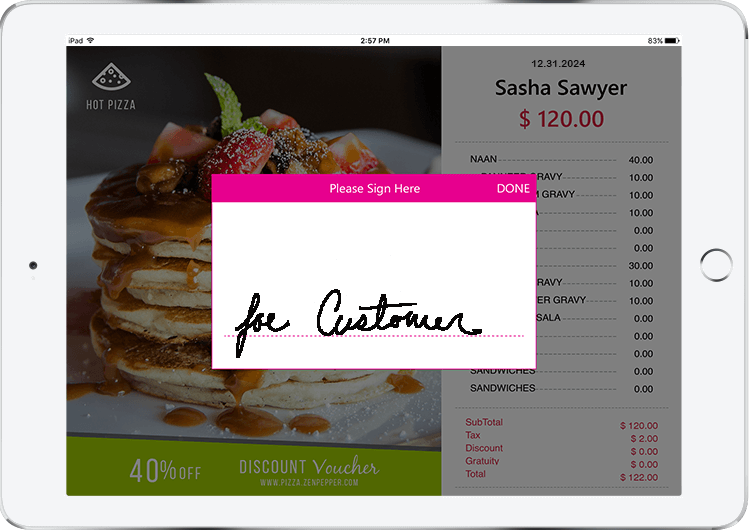 LexgiaPOS CDS is a customer facing display that they are able to interact with during checkout. The easy and fast technology provides high levels of service and convenience for customers, allowing for less delay at checkout and increased consumer satisfaction. Equipped with a tip processing feature and required digital signature, the system provides quick service that is both enjoyable and more secure. The application can also prompt customers to opt-in to your loyalty program if you choose, driving more signups.
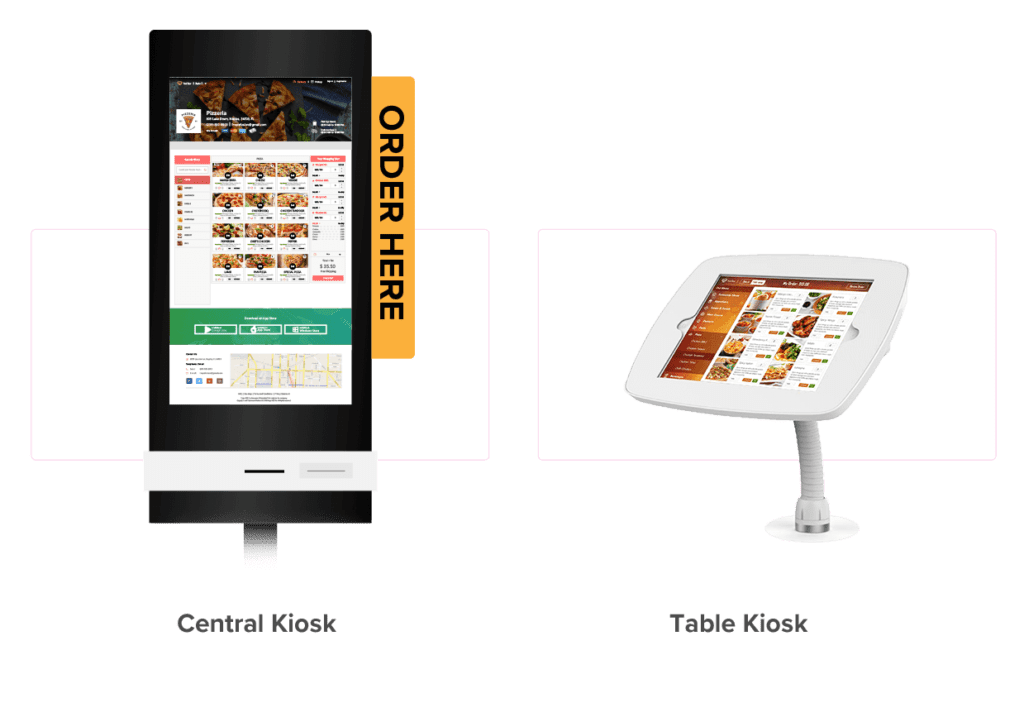 Self-order kiosk checkouts allow for customers to fully engage with the order and checkout processes independently, creating a more convenient customer experience while simultaneously lifting pressure from the front-of-house staff. LexgiaPOS Kiosk quickens the process of making and dispatching orders by communicating directly to a second display system located in the kitchen. The application eliminates extra steps by enabling direct communication from your consumers’ fingertips to the eyes of the kitchen staff.
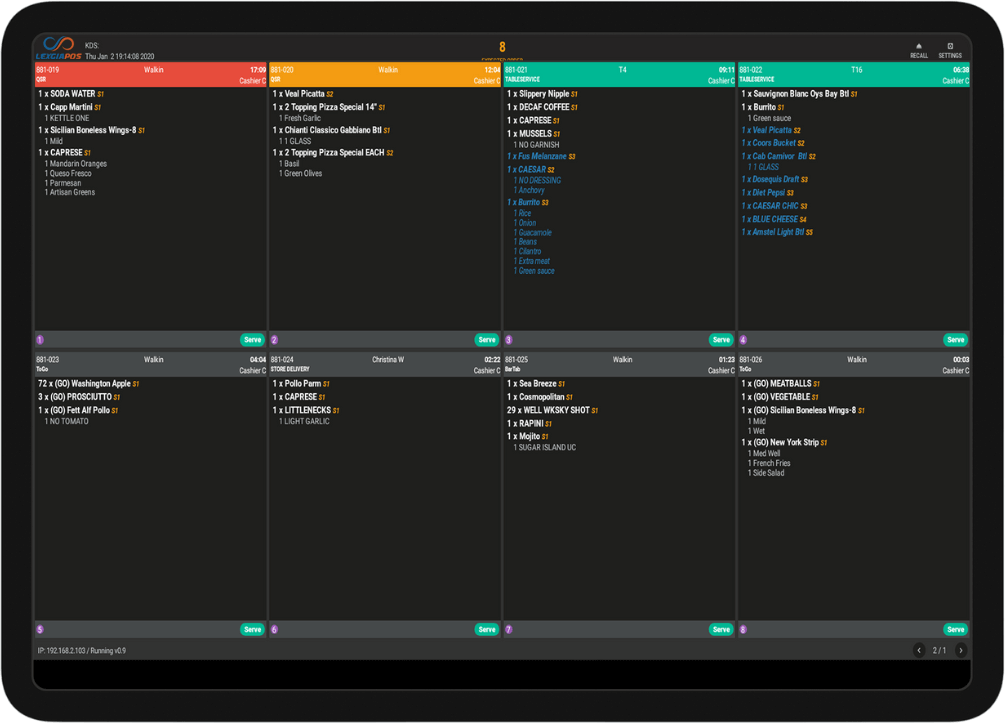 LexgiaPOS KDS is a system specifically designed for catering to needs inside the kitchen. Always in direct communication with the front-of-house display, both systems can stay connected even without internet, allowing for no interruptions to the flow of your workday.
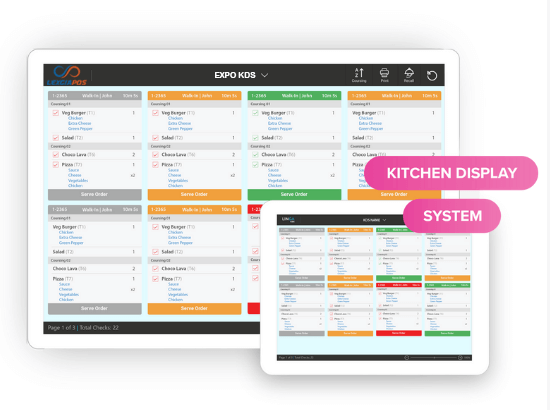 If your restaurant serves pizza, LexgiaPOS KDS allows your customers to customize a pie down to the slice and make their topping choices as elaborate as desired. Customers can also receive SMS text alerts directly from the kitchen so that they are notified as soon as their order has been completed. The kitchen display system allows for optimal efficiency and a significant reduction of error and waiting time.
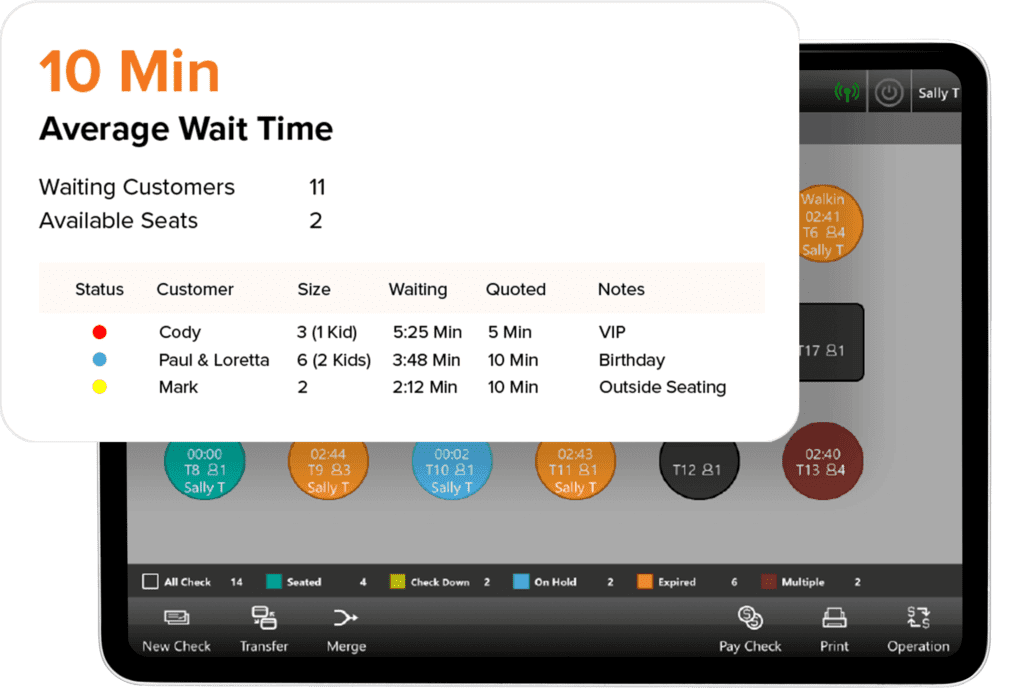 Excessive wait times can lead to customer dissatisfaction, lack of repeat business, and loss of sales. LexgiaPOS Waitlist is a fully integrated application within the operating system that tracks and manages your business’s bookings and guests to ensure minimal wait time and maximal communication with your customers. Equipped with a wait time calculator and synced with the statuses of your tables, the application remains constantly updated and can keep your customers in the loop as well by sending SMS text alerts regarding the status of their wait.